WORKING WITH LOGICAL VOLUME MANAGER (LVM) - SUB-PART 1:
Objective for the module
•Working with Volume Groups

You can use the fastpath# smitlvmto get into this menu. In this menu you can manage many aspects of logical volume manager,
a.Volume Groups:This menu can be used to manage the Volume Groups on your system. Adding, Removing, setting and changing the characteristics of a volume group etc.
b.Logical Volumes: This menu can be used to manage the Logical Volumes (partitions) on your system. You can add a new logical volume, remove an existing logical volume, change and view the characteristics of a logical volume, add mirror copies to an existing volume group, remove mirror copies etc.
c.Physical Volumes:This menu can be used to configure and use your physical volumes (hard disks) on your system.
d.Paging Space: This menu can be used to add, delete, activate and list the paging spaces that are available on your system.
You can also use the WSM (Web Based System Manager) to manage the various options of Logical Volume Manager.

Physical Volumes are nothing but the hard disks on your system. These physical volumes belong to a Volume Group. A volume group can have up to 1024 PVs per volume group.
A Volume Group is a collection of related PVs. These PVs can be members of one single Volume Group and they all share a single physical partition size.
During the installation of AIX system, a default volume group called rootvg gets created.
There can be a maximum of 255 Volume Groups per system.

You can use the fastpath# smitvgto get into this menu to manage all issues relating to the Volume Group.
All these will be discussed one by one slowly.
# lsvg
rootvg
datavg
# lsvg –o
rootvg
You can use the lsvg command to list the volume groups available on your system.
You can use the –o option with the lsvg command to list only the active volume groups i.e. only those volume groups that are varied on.


LTG is the maximum transfer size of a logical volume
Prior to AIX 5L V5.3:
–Default LTG size is 128 KB
–LTG size can be changed by the -Lflag on the chvgor mkvgcommand
In AIX 5L V5.3 and above:
–AIX 5L V5.3 dynamically sets the LTG size (calculated at each volume group activation)
–LTG size can be changed with the command: varyonvg -M <LTGsize>
–The mkvg -Lflag is no longer supported
–The chvg -Lflag has no effect on volume groups created in AIX 5L V5.3
–Enable variable LTG on old volume groups using chvg -L 0
To display the LTG size of a disk, use the command:
# /usr/sbin/lquerypv -M <hdisk#>
LTG (Logical Track Group) size is the maximum allowed transfer size for disk I/O operations. In the earlier versions of AIX, the LTG size that was supported was 128 kb. Many hard disks now a days support larger sizes of transfer rate. So to take the advantage of these larger transfer rate you can change the LTG size to the size iesupported by the disks.
# /usr/sbin/lquerypv –M hdisk0
256 . -> the LTG size of the hdisk0 is 256. So the LTG size of the volume group can be changed to this
value.
You can set the LTG size while creating the volume group ie while using the mkvg command or after the
creation of the volume group using chvg command .
In AIX version 5.1 and above, the following values for the logical track group size is supported:
a.128 kb
b.256 kb
c.512 kb
1024 kb

HOT SPARE: Is a disk or group of disks used to replace a failing disk. LVM marks a physical volume missing due to write failures and then it starts the migration of data to the hot spare disk.
For incorporating Hot Spare in the LVM, logical volumes must be mirrored, All logical partitions on hot spare disks must be unallocated and hot spare disks must have at least equal capacity to the smallest disk already in the volume group.
Hot Spare Policy:
y(lower case) -> automatically migrates partitions from one disk to one spare. The smallest spare which is enough to substitute for the failing disk will be used.
Y (upper case) -> automatically migrates partitions from a failing disk, but might use the complete pool of hot spares.
n-> No automatic migration occurs. This is the default value.
r -> Removes all disks from the pool of hot spare disks.
Hot spare synchronizing policy
y -> automatically attempts to synchronize the stale partitions.
n -> Will not automatically attempt to synchronize. This is the default
E.g.: chpv–hyhdisk1-> marks hdisk1 as a hot spare.
chvg–hy–sytestvg-> sets automatic migration policy and automatic synchronizing policy.
 Note: Will not retain current disk contents
To activate a volume group:
# varyonvg oravg
To deactivate a volume group
# varyoffvg oravg
Explanation:
The command varyonvg can be used to activate a volume group that is not activated at system startup.
There is also an option with varyonvg i.e. –f option. This option can be used to force a volume group to get activated. This may be needed if you have lost the quorum, but still want to varyon the VG.
The command varyoffvg can be used to deactivate a volume group. No logical Volumes should be open when you run this command.
NOTE: Its not possible to varyoffvg the rootvg.
Importing a Volume Group

If you have a volume group on a removable disk that you want to access on another system, you must export the volume group from the current system using the exportvg command. This command removes the volume group related information from the system (i.e. from the ODM). To export a volume group it should be inactive.
To access the exported volume group on another system it has to imported into the other system by using the importvg command.
List of Search Terms:
AIX LVM
AIX Logical Volume Manager
Logical Volume Manager
Working with LVM
Working with AIX Logical Volume Manager
Working with Logical Volume Manager
Working with Volume Groups
Volume Groups
Everything about Volume Group in AIX
AIX Volume group
Objective for the module
•Working with Volume Groups
Logical Volume Manager

You can use the fastpath# smitlvmto get into this menu. In this menu you can manage many aspects of logical volume manager,
a.Volume Groups:This menu can be used to manage the Volume Groups on your system. Adding, Removing, setting and changing the characteristics of a volume group etc.
b.Logical Volumes: This menu can be used to manage the Logical Volumes (partitions) on your system. You can add a new logical volume, remove an existing logical volume, change and view the characteristics of a logical volume, add mirror copies to an existing volume group, remove mirror copies etc.
c.Physical Volumes:This menu can be used to configure and use your physical volumes (hard disks) on your system.
d.Paging Space: This menu can be used to add, delete, activate and list the paging spaces that are available on your system.
You can also use the WSM (Web Based System Manager) to manage the various options of Logical Volume Manager.
Volume Groups

Physical Volumes are nothing but the hard disks on your system. These physical volumes belong to a Volume Group. A volume group can have up to 1024 PVs per volume group.
A Volume Group is a collection of related PVs. These PVs can be members of one single Volume Group and they all share a single physical partition size.
During the installation of AIX system, a default volume group called rootvg gets created.
There can be a maximum of 255 Volume Groups per system.
Volume Groups Menu

You can use the fastpath# smitvgto get into this menu to manage all issues relating to the Volume Group.
All these will be discussed one by one slowly.
Listing Volume group
# lsvg
rootvg
datavg
# lsvg –o
rootvg
You can use the lsvg command to list the volume groups available on your system.
You can use the –o option with the lsvg command to list only the active volume groups i.e. only those volume groups that are varied on.
Listing information of Volume Group

You can use the lsvg command to list the details about the volume Group.
The output of this command gives lot of information about the volume groups. The important ones are:
a.PP size of the volume group.
b.Number of PPs.
c.Number of PPs free.
d.Status of the Volume Group.
e.Number of PVs in the Volume Group etc.
Listing information of Volume Group (physical)

You can use the lsvg command with –p option to get the information about the physical volumes within the volume group.
The output of the above command gives details about:
a.Name of PV : Physical Volume names.
b.State of the PV: PV state in terms of active or inactive
c.Total number of PPs: How many number of PPs are there per PV.
d.Free number of PPs: How many PPs are free.
e.Free Distribution: The distribution statistics of the free PPs i.e. intra policy (inner edge, inner middle, centre etc)
Listing information of Logical Volumes

You can use the command lsvg with the option –l to get the information of the Logical Volumes within a Volume Group.
The output of the command would give lots of details about the Logical Volumes like,
a.Name of the Logical Volume
b.Type of the Logical Volume, like jfs, jfs2, boot, paging. The type determines the purpose of these logical volumes, ie whether they are used for regular file storage, or for booting purpose or these logical volumes are used as paging space etc.
c.Number of Logical Partitions (LP)
d.Number of Physical Partitions (PP)
e.Number of Physical Volumes occupied by these Logical Volumes.
f. Logical Volume state whether open and synchronized, or closed.
g.Mount point for the logical volume if the type of the Logical volume is either jfsor jfs2.
Adding a Volume Group

You can use the fastpath #smit mkvg to add a new volume group.
When you install the AIX operating system on your system, there would be a default Volume Group created on your system called rootvg.
In case you want to add another hard disk (Physical Volume) to your system, you can add this PV to the existing Volume Group i.e. rootvg or you can create a new Volume Group and make the new hard disk (Physical Volume) to belong to the new volume Group.
You can also use the high level command to create a new volume group
# mkvg –s 16 -y datavg hdisk1
The above command will create a new volume group with the name datavg
( -y ) with the hard disk hdisk1 into it and the PP size for the volume group is 16 MB (-s).
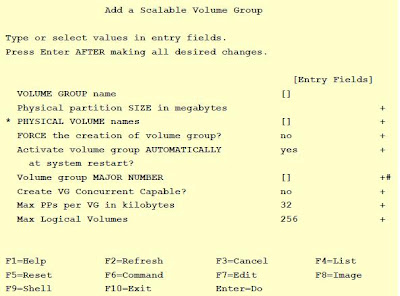
There is a option called the MAJOR NUMBER, this is used by the kernel to access this volume group.
The options in the smit menu pertaining to Concurrent Mode and Concurrent Capable is only Valid if you have HACMP (High Availability Cluster Multi-Processing) software installed on your system. Otherwise there is no meaning for these options.
Add a Scalable Volume Group
# smit mkvg

Removing a Volume Group

If there are no more physical volumes in a Volume Group, you can use the fastpath #smit reducevg2 to remove the volume group.
There is high level command to Remove a volume Group. The correct way to remove a volume group is to remove the physical volume ( using the reducevg command) and this will remove the volume group when you have removed the last physical volume in it.
The syntax for the reducevg command is:
# reducevg datavg hdisk1
Where datavg is the name of the volume group and hdisk1 is the physical volume that you are planning to remove from the volume group.
Set the characteristics of a Volume Group

You can use the fastpath #smit vgsc to set the characteristics of a volume group.
You can change a volume Group features, You can add a new physical volume to an existing volume group.
You can also remove a physical volume from a volume group or you can also reorganize the volume group.
The high level command called extendvg can be used to add a new physical volume to the existing volume group.
# extendvg datavg hdisk2
The high level command called reducevg can be used to remove a physical volume from an existing volume group.
# reducevg datavg hdisk1
Change the characteristics of a volume group

You can use the fastpath #smit chvg to change the characteristics of a volume group
Logical Track Group (LTG) Size
LTG is the maximum transfer size of a logical volume
Prior to AIX 5L V5.3:
–Default LTG size is 128 KB
–LTG size can be changed by the -Lflag on the chvgor mkvgcommand
In AIX 5L V5.3 and above:
–AIX 5L V5.3 dynamically sets the LTG size (calculated at each volume group activation)
–LTG size can be changed with the command: varyonvg -M <LTGsize>
–The mkvg -Lflag is no longer supported
–The chvg -Lflag has no effect on volume groups created in AIX 5L V5.3
–Enable variable LTG on old volume groups using chvg -L 0
To display the LTG size of a disk, use the command:
# /usr/sbin/lquerypv -M <hdisk#>
LTG (Logical Track Group) size is the maximum allowed transfer size for disk I/O operations. In the earlier versions of AIX, the LTG size that was supported was 128 kb. Many hard disks now a days support larger sizes of transfer rate. So to take the advantage of these larger transfer rate you can change the LTG size to the size iesupported by the disks.
# /usr/sbin/lquerypv –M hdisk0
256 . -> the LTG size of the hdisk0 is 256. So the LTG size of the volume group can be changed to this
value.
You can set the LTG size while creating the volume group ie while using the mkvg command or after the
creation of the volume group using chvg command .
In AIX version 5.1 and above, the following values for the logical track group size is supported:
a.128 kb
b.256 kb
c.512 kb
1024 kb
Concept of the Hot Spare

HOT SPARE: Is a disk or group of disks used to replace a failing disk. LVM marks a physical volume missing due to write failures and then it starts the migration of data to the hot spare disk.
For incorporating Hot Spare in the LVM, logical volumes must be mirrored, All logical partitions on hot spare disks must be unallocated and hot spare disks must have at least equal capacity to the smallest disk already in the volume group.
Hot Spare Policy:
y(lower case) -> automatically migrates partitions from one disk to one spare. The smallest spare which is enough to substitute for the failing disk will be used.
Y (upper case) -> automatically migrates partitions from a failing disk, but might use the complete pool of hot spares.
n-> No automatic migration occurs. This is the default value.
r -> Removes all disks from the pool of hot spare disks.
Hot spare synchronizing policy
y -> automatically attempts to synchronize the stale partitions.
n -> Will not automatically attempt to synchronize. This is the default
E.g.: chpv–hyhdisk1-> marks hdisk1 as a hot spare.
chvg–hy–sytestvg-> sets automatic migration policy and automatic synchronizing policy.
Extending and Reducing Volume Groups

Activate/Deactivate a Volume Group
To activate a volume group:
# varyonvg oravg
To deactivate a volume group
# varyoffvg oravg
Explanation:
The command varyonvg can be used to activate a volume group that is not activated at system startup.
There is also an option with varyonvg i.e. –f option. This option can be used to force a volume group to get activated. This may be needed if you have lost the quorum, but still want to varyon the VG.
The command varyoffvg can be used to deactivate a volume group. No logical Volumes should be open when you run this command.
NOTE: Its not possible to varyoffvg the rootvg.
Importing a Volume Group

If you have a volume group on a removable disk that you want to access on another system, you must export the volume group from the current system using the exportvg command. This command removes the volume group related information from the system (i.e. from the ODM). To export a volume group it should be inactive.
To access the exported volume group on another system it has to imported into the other system by using the importvg command.
List of Search Terms:
AIX LVM
AIX Logical Volume Manager
Logical Volume Manager
Working with LVM
Working with AIX Logical Volume Manager
Working with Logical Volume Manager
Working with Volume Groups
Volume Groups
Everything about Volume Group in AIX
AIX Volume group


Thanhk u so much :)
ReplyDelete