Friday 9 September 2011

AIX Backup and Restore- Part 1

BACKUP and RESTORE for AIX Explained in detail.

Objectives for the module
•Understand the various different backup methods supported in AIX.
•Identify points to remember about media to use while backup, frequency of backup and type of backup.

Necessity of Backup

•Disaster Recovery Plan: Hardware failure, damages due to repair, installation, Accidental deletion
•Data is important and very expensive to recreate.
•System Image for installation
•Transfer of Data between Systems
•Long Term archive
•Before and After upgrade

Explanation:

•Backups are very much in the Disaster Recovery plan of the organization. In case there is a hardware failure, some damage to the data due to repair or installation, or due to accidental deletion, to get back the data, you need to have a backup plan.
•Data is very expensive and important. Sometimes data is far more important and expensive to replace than the hardware.
•If you are going to install a number of similar machines, system backup is one of the best options that you can have.
•One easiest way to transfer a number of files from one machine to another is to back those files onto the media and restore it on the target machine where you want to transfer the data.
•Its also recommended that before and after a system upgrade, in terms of hardware upgrade or software upgrade (operating system upgrade), its better to have a backup of your system.

Necessity of Restore

•Recover a deleted file
•Recover from a complete system crash
•Use old or archived data
•Compare versions of files

Types of Backup


Explanation:

There are mainly 3 kinds of backup. They are:-
a.System backup: In system backup, it records image backup of the whole operating system.
b.Full backup: In Full backup, it preserves all user data and configuration files.
c.Incremental backup: In Incremental backup there are 2 kinds:-
>a. first method: Do a full backup on a particular day and rest of the week, only backup the files that have changed from the previous day. Advantage of this method of backup is, its faster but the disadvantage could be it could use up lots of tapes and if one of the tapes also is missing you may have problems to restore the data.
>b. second method: Do a full backup on a particular day and other days take a backup of changes made since the previous full backup. This may take slightly longer time compared to the first method. The advantage is that the restoration procedure does not depend on the tape from the previous day.


Strategy for Backup

Explanation:


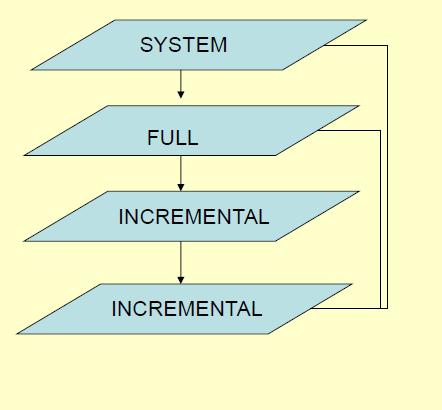
The above picture shows one example of a backup strategy that can be followed by an organization.

According to the slide, There is a system backup taken , then a full backup is taken on a periodic basis. Lets say on a weekly basis. On each day they may be taking an incremental backup ( either using the first method or the second method).

Devices for Backup -Floppy

/dev/fd0


One of the devices that can be used for backup is the floppy or the diskette.
This device is suitable if the size of the data that you are backing up is small.
The logical device name for the diskette drive is /dev/fdx. Most of the systems will have a single floppy disk drive so the name of the device would be mostly fd0.
There are lot of commands that can be used in AIX to work with the diskette.

They are:-
a.format command: Can be used to format a diskette. You can use the –l option with the command to format at low density.
b.flcopy command: Can be used to copy diskettes. ( diskcopycommand in DOS)
c.dosformat command: format the diskette using DOS formatting.
d.dosread: to read form the diskette (DOS diskettes)
e.doswrite: to write to a diskette (DOS diskettes)
f.dosdir: to list / view the contents of the diskette.
For all the dos related command to run, the fileset bos.dosutil has to be installed.


Devices for Backup - Tape

/dev/rmt0

•4 mm DAT
•8 mm
•1/2 – inch cartridge
•DLT

Low Capacity                        Retention on Open                             Rewind on Close


Explanation:


•The most common device used now a days for backup is the tape. There are various types of tapes available:
a.4mm DAT (Digital Audio Tape)–can hold up to 40 GB of data and transfer rate of 6 MB/sec
b.8 mm Tape–can hold up to 40 GB of data with a data transfer rate of 6 MB/sec.
c.1/4 inch cartridge: can hold up to 4 GB of data and transfer rate of 380 kb/sec
d.DLT (Digital Linear Tape)–can hold up to 70 GB at a transfer rate of 10 MB/sec
•The tape devices use the logical device name of rmtx( raw magnetic tape).
•There may be additional logical names assigned to each tape device depending on the device characteristics in terms of Write at Low Capacity, Retensionthe tape (fast forward and rewind before starting the operation) and Rewind the tape at the finish of the operation.

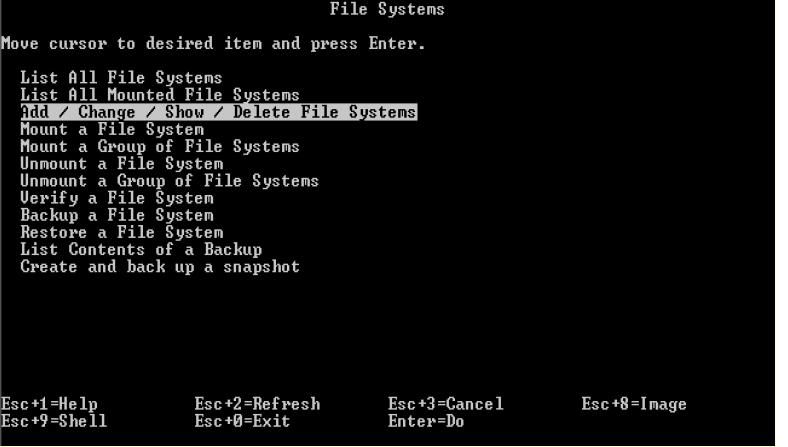
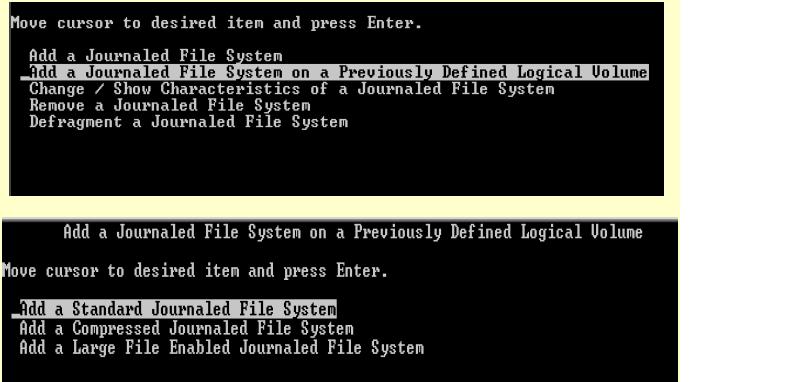
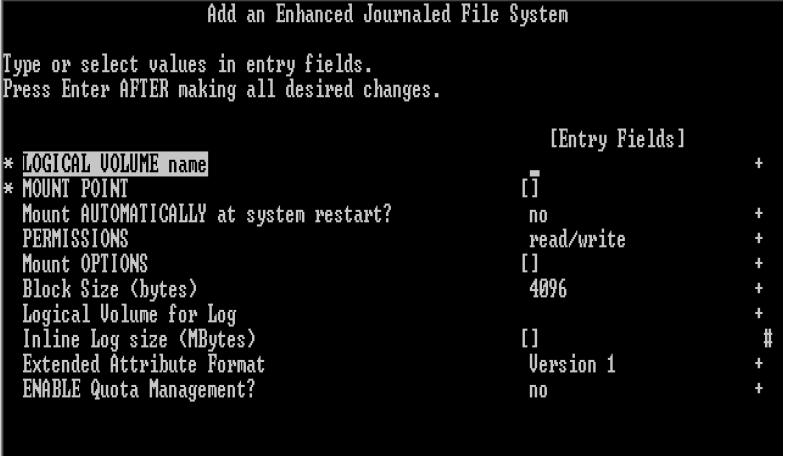
Devices for Backup –r / w Optical Drive


You can use JFS file system for read/write operations
You can use CD-ROM file system (cdrfs) for read only options

Explanation:

•Another device that is widely used now a days for backup is the read/write optical drive. AIX supports both, the optical drive as well as standard CD-ROM.
•The steps to access the data on the r/w optic drive like a standard read only CD-ROM drive are:-
•a. Create the file system (smit crcdrfs or crfs–v cdrfs –p ro –d <device name>)
•b. Mount the file system (mount <mount-point>)
     To use the optic drive as r/w optic drive, the steps are:
     Make the vg and add this device to it. (smit mkvg or mkvg –f –y vgname –d 1 device-name)
     Create a file system (smit crfs or crfs –v jfs –g vgname –a size=sizefilesystem -m mountpoint –A automaticmount –p rw
•c. Mount the file system.

#############################CONTINUED##############################

We will see more about AIX BACKUP and RESTORE in Part -2 . Stay Tuned!


Incoming search results:
aix backup
aix backup methods
aix restores
aix backup commands
types in aix backup
aix backup explanation

Tuesday 9 August 2011

Paging Space in AIX

AIX Paging Space with Diagrams.

Objectives for the module

• What is Paging Space ?
• Define the requirement of Paging Space
• Maintain paging space
• Troubleshoot paging space problems


Introduction: Paging Space


Explanation:

•Virtual Memory Manager (VMM) manages paging and virtual storage related issues on your AIX.

•A running application is called as a process and these processes have to be loaded on the memory. These processes occupy 4 kb blocks on the memory called pages. As more and more processes increase on your system, the pages on the memory may not be enough for the processes to be loaded. At this juncture the inactive pages belonging to a process is moved out of the memory into the disk space called “Paging Space”, this process is called Page Out. And when-ever these inactive pages are required again by the process, they have to moved back again onto the RAM, this process is called Page In.

•The Paging Space is nothing but a area on your hard disk that contains these moved in inactive pages of the memory.

Paging Space

•Is a logical partition on the hard disk
•Acts as a temporary storage place for the “pages
•Cannot be used as RAM

Explanation:

•Paging Space holds the inactive memory frames.

•Paging space just acts as a temporary storage area for the in-active pages and cannot be treated as a substitute for RAM. If enough memory is not available on your machine, you may get into a scenario called thrashing.

Thrashing: Trashing is a state of paging when you do not have enough memory. When the VMM attempts to make place for a new process in the memory by moving an in-active page into the paging area, the process will need that page again in the memory wherein now VMM has to perform Page-In activity to put back the page again into the memory. Your machine is too busy only doing Page-Out and Page-In activity and no real work is done on your machine.
•In a scenario where there is thrashing, you may not be able to solve the problem just by increasing the paging space but you may have to increase your RAM to solve this problem.

Paging Space –Criteria

•Thumb rule –twice the size of RAM
•Recommendations:
–Have only one paging space per disk.
–Do not stretch paging space logical volume to spread across more than one physical volume.
–The size of paging space should be roughly same.
–Do not create paging space on a busy hard disk.

Explanation:

•Paging Space is created during the AIX installation. As a thumb rule usually the paging space is set twice of your RAM, but actually this calculation of the size of the paging space actually depends on the amount of RAM available on your system.

•If the RAM is greater than or equal to 64MB, the paging space is RAM+16 MB. If RAM is less than 64 MB, paging space is twice the size of RAM.

•When you are running low on paging space, you may get some errors like this:
 #
 Ksh: cannot fork no swap space

•At this point you will not be able to start any new processes until some processes are terminated.

 Recommendations:
•Do not have more than one paging space per hard disk as paging space is allocated in a round robin manner and will use all paging areas equally. If you have two paging spaces on one disk, then you are no longer utilizing the other disks for paging activity. Do not have paging space on an already burdened hard disk. Roughly the paging spaces should be of the same size so that paging activity is balanced and faster. The paging space as a recommendation, should not span multiple hard disks.

Managing Paging Space

Use the # lsps –a command to check the paging activity.

Paging space information is stored in the file /etc/ swapspaces 

Explanation:

•Monitoring the paging activity can be done with the command lsps–a.

•This command shows you the page spaces, on which hard disk they have been created, which volume group they belong to , their size, usage, whether active or not etc.

•The file /etc/ swapspaceswill hold details about the paging spaces. This file contains information about the paging areas, their logical devices names etc.

Creating a Paging space


Explanation:

•During the installation of AIX itself , system defined paging space is created. If its required you can use the smit fastpath mkps to create a new paging space
 # smit mkps
•You may have to specify the volume group name where you are planning to create the paging space, size of the paging space and the hard disk on which you are planning to create it.
•You can use the option Start using this paging space NOW to activate the paging space immediately for use and you can use the option Use this paging space each time system is RESTARTED to activate the paging space at the next restart.


Modifying Paging Space settings


Explanation:


•If you want to change the settings of the paging space, you can do that by using the smit fast path chps.
 #smit chps


•You can decrease the paging space or you can increase the paging space. The option of decreasing the paging space is newly added in AIX Ver5.1 and it internally uses a high level command called shrinkps o do the same.

•The system default paging space i.e. hd6 cannot be decreased below 32 MB.

Remove Paging Space


To Remove Paging space,
a. Make the paging space inactive by using the swapoff command
# swapoff /dev/paging01


b. Remove inactive paging space
# rmps paging01


Explanation:


•If you have too much of paging space and the usage is low, extra paging space can be deleted.

•Active paging spaces has to be deactivated ( which is possible dynamically from AIX Ver5.1) before you delete it.

Swapoff command along with the paging space logical name can be used to deactivate a paging space and then you can use the rmpscommand to remove the paging space.


Problems with Paging Space


•Paging space too small:

Dynamically increase the size by allocating more partitions
chps -s LogicalPartitions PagingSpace
Example:
# chps -s 1 paging00

•Paging space too large:
Dynamically decrease the size by deallocating partitions
chps -d LogicalPartitions PagingSpace
Example:
# chps -d 1 paging00


Explanation:


•If the paging space is too small, it can be dynamically increased like any other logical volume.

•If the paging space is too large, then you can use the chpscommand to decrease the paging space.
 # chps –d 2 paging01

 -d 2-> delete 2 logical partitions

 Paging01-> paging space name

#######################END#######################

Incoming Search Terms:
Paging space for AIX
Paging Space
Paging Space in Unix
AIX paging space commands
Paging space commands for AIX
Complete list of AIX paging space commands
chps command in AIX


Thursday 28 July 2011

Working with AIX filesystem PART 3

Today we shall see something about managing file-systems in IBM AIX.

Managing File Systems

Objective:

•File system integrity
•Manage/Monitor
–File system growth
–File growth
–File system space usage

How/Why Space Management ?


How ?

•Find the causes
•keep track of growing files
•check file system space usage
•check disk space

Explanation:


•If a File System reaches its full capacity, that means it cannot take any more data onto it. The filesystem size in these cases has to be increased because the file system size doesn‟t automatically increase.

•Our duty as system administrators is to use commands and techniques to find the causes for the increase in the file system size. This may involve tasks like keeping track of the growing files in the file system. Keep checking the file system space usage and decide whether to increase the size or not.

•The files that could keep growing at high speed are:

a./var/adm/wtmp-> Which keeps track of successful login information
b./etc/security/failedlogin-> which keeps track of failed login attempts.
c./var/spool-> directory which keeps cronentries, mails etc
d.$HOME/smit.log and smit.script-> smitrelated log files
e.$HOME/websm.log and websm.script-> WSM related log files
f./var/adm/sulog-> Keeps track of sucommand usage.

•Many of the above files are required files as they contain very useful information of activities going performed on the system. Completely removing them of may not be a recommended strategy but keeping eye on their increasing size and timely cropping them and removing old entries would be the maintenance task that could be done by the Administrators.

Free Disk Space


Explanation:


•You can use the dfcommand to display useful information about the statistics pertaining to the free disk information. The output of this command would show all the file systems, their sizes and out of the total size, how much is used and how much is free.

•Please refer to the man pages on df command to look at some useful options that you could use with df.

•There is also a very useful command called skulker.The skulker command is under /usr/sbin.

•The skulker command can be used to clean up the file systems by removing unwanted or old files. You can modify this skulker shell script by using an editor and configure it according to your environment.


Disk Usage

Explanation:


•The Disk Usage command (du) can be used to list the files and how many number of data blocks are utilized by them.

•If you look at the above example, the du command is giving the information of the file name, and how many number of 512 byte blocks has been allocated to that particular file. So by looking at this output you can make out as to which files are using more data blocks and take actions if required.

•du command comes with lots of very useful options like –x , -k etc. If you want more details on the various options that can be used with the du command, please look at the man pages for the same.


Control Growing Files


•/var/adm/wtmp
•/etc/security/failedlogin
•/var/adm/sulog
•/var/spool/*/*
•$HOME/smit.log
•$HOME/smit.script
•$HOME/websm.log
•$HOME/websm.script

The skulker Command


•The skulker command cleans up file systems by removing unwanted or obsolete files

•Candidate files include:
–Files older than a selected age
–Files in the /tmp directory
–a.outfiles
–corefiles
–ed.hupfiles

•skulker is normally invoked daily by the cron command as part of the crontab file of the root user

•Modify the skulkershell script to suit local needs for the removal of files

Listing Disk Usage


•The ducommand can be used to list the number of blocks used by a file or a directory

# du /home | sort -r -n
624 /home
392 /home/fred
98 /home/tom
54 /home/mary
52 /home/liz
23 /home/suzy
2 /home/guest
1 /home/steve

•To view individual file sizes, use the ls -l command.

Fragmentation Considerations


Without fragmentation
File size = 2000 bytes

With fragmentation
File size = 2000 bytes
Fragment size = 1024 bytes

Considerations to be made:
Disk space allocation
Disk space utilization
I/O activity
Free space fragmentation
Fragment allocation map

Explanation:

•In AIX the filesystem is broken into blocks called as data blocks. These data blocks by default are 4 kb in size i.e. 4096 bytes in size.

•Lets imagine you have a file called file1 which is about 1900 bytes. To store this file in the filesystem, you will require a data block (4 kb). That means file1 occupies 1900 bytes of the data block and the rest of the space in the 4 kb data block is empty. But even though rest of the space is empty, this space cannot be utilized by the file system to allocate it any other file. So in these circumstances, potentially you could have more amount of unused or wasted space.

•Here is where we can get an intro to the concept of  “Fragmentation”.

•Fragmentation is a concept wherein a single data block can be broken logically into smaller fragments of size ranging from 512 bytes to 4 kb. Lets say I choose a fragment size of 1kb, that means the data block of 4 kb size is broken into 4 fragments.This would ensure that if there was a small file lets say about 1900 bytes, to store this particular file, I would potentially use up only 2 fragments of the data block and the other two fragments can be allocated to files if necessary. Thus reducing the amount of unused and wasted space in your filesystems.

Defragmenting a File System

•The defragfs command increases a file system's contiguous free space

•The file system must be mounted
defragfs [-q | -r | -s] filesystem

Options:
-q Reports the current state of the file system
-r Reports the current state of the file system and the state that would result if the defragfs command is run without either -q, -r or -s
-s Gives short report regarding the current stateof the file system

Explanation:

•Although fragmenting decreases the amount of unused or wasted space, this can actually cause some performance related problems also.

•For example: Lets imagine that the fragment size is 4 kb. There is file of 4 kb size. So 1 data block (fragment) would be assigned to the file. If I want to read this file there would be 1 I/O operating that needs to be done to read the content of the file (disk I/O happens in terms of fragment size).

•Lets say I have the same 4 kb file, but the fragment size instead of 4 kb, I‟ve changed it to 1 kb. That means to allocate space to this particular file I may require 4 1kb blocks. That means if I want to read the same file now there would be 4 disk I/O operations that needs to happen. Which would be time consuming.

•Defragmentation of the filesystemincreases the file systems contigous free space by rearranging the fragments in such a way that files get more contigousspace for allocation.

•The command:
•# /usr/bin/defragfs (-q –r ) filesystem

•can be used to report the current status of the file system and also report what would be the state of the file system after defragmentation is done.

•The file system should be mounted when you run this command.


Verify a File System

•Command syntax:

fsck [-p | -y | -n] [-f] [ file system ]

•Checks journal log

•Checks inodes, indirect blocks, data blocks, free lists

•If no file system name is specified, the fsck command checks all file systems which have the check=true attribute set in the /etc/filesystems

•Orphan files are placed in the lost+found directory

•Unmount the file system before running fsck

Complete explanation:

•File system check or fsckcan be used to verify a file system and check for its consistency. It basically checks the journal log to determine if any activity was pending, it checks the inodes, direct and indirect data block against the free lists.

•fsck command comes with lots of options:-
•-p-> stands for „preen‟. That means do not ask for any confirmation, do any minor changes required. Some people also call this option “silent” that is don‟t disturb me….
•-y-> The answer would be yes for all the questions asked during fsck
•-n-> The answer would be No for all the questions asked during fsck
•-f-> to specify the file system to conduct fsck.

•If no filesystemname is specified with the fsckcommand, all the file systems that have the option check=truespecified in the configuration file /etc/ filesystemswill be checked.


++++++++++++END++++++++++++++


Thursday 21 July 2011

Working with AIX filesystem PART 2

Objective of the module:
How to create a file system
Change the characteristics of a file system

File Systems

Explanation:

You can use the fastpath#smitfsto get into this menu option in AIX to perform file systems related tasks.
File systems can also be managed using the Web Based System Manager.

Listing file systems
Explanation:


You can use the commandlsfsto get a list of all the file systems.

The output in the above visual shows details about the file system. The various attributes of the output are:
a.Name of the file system
b.Node Name, which is only valid if the file system is a Network file system.
c.Mount Point for the file system.
d.Virtual File System (jfs, jfs2 or cdrfs)
e.Size of the file system
f.Mount options if any, like ro(read only) or rw(read-write)
g.Auto, automatic mounting during system startup or not.

You can also use the fastpath #smitfs to get the same details.

Mounted File Systems listing


Explanation:
The mount command can be used to list all the file system that are at present mounted on your system.
It gives you details about the node (valid only for a NFS file system), the logical device name of the file system, mount point, vfs information, date when it was mounted and mount options if any (readonly, readwrite, log information).
You can also get the same information from SMIT also.

Adding a File System


Explanation:


These are the general steps in SMIT to start with the job of creating a file system.
#smit fs will take you to this menu option. Here you can choose the option,
Add/Change/Show/Delete File systems to start adding a file system.

In the next step it asks you to select the type of file system is JFS, JFS2 or cdrfs or NFS. Lets say you select the Journalled File System.


Adding a file system on a previously created LV


Explanation:


In this step, it asks you to select whether you want to create a file system directly or you want to create the file system on a previously defined logical volume.
Lets say you have already created a logical volume and now you want to just create a file system over it, then the ideal option to select is the second option ie Add a journaledfile system on a previously defined logical volume.
When you select the option, it asks you select the type of Journaledfile System iestandard, Compressed or Large File Enabled File System. Lets say you select to add a standard Journalled File System you’ll be shown the appropriate screen to make selections.


Adding a standard jfs file system on previously defined logical volume


Explanation:


This is the dialog panel to create a file system on an existing logical volume.,
The only mandatory fields here are the logical volume name on which you are planning to create the file system and the mount point.

Adding standard JFS


Explanation:


The picture above shows you how you can create a file system directly. That means you want to create the file system and the logical volume in a single step.

The mandatory fields here are you need to select the volume group name where you are planning to create the file system, specify the size of the file system, and the mount point for your file system.

The name of the logical volume thus created will follow the default naming convention in AIX for naming logical volumes i.e. lv00, lv01,lv02 …..

Add a JFS2 File System on a previously created Logical Volume


Explanation:

The above snap shows how you can create a JFS2 file system on a previously existing logical volume. The options are the same like the JFS file system except for the options of having an inline logwhich is a log placed in the same file system.

Add a JFS2 file system


Explanation:


This picture shows how you can directly create a JFS2 file system that means create a logical volume and the JFS2 file system over it in one single step.

Most of the options are just like JFS ie you need to specify the volume group name where the logical volume will be created, the size of the file system and the mount point. You also have an option of enabling inline log option if required.

Mount a File System


Explanation:


You can use the command mount to mount a file system. This can also be done using smit.
File systems that are defined in the file /etc/filesystems with mount=trueor mount=automatic options will be mounted automatically during system startup.

You can either mount a single file system or a group of file systems.
The syntax for mount is
# mount /dev/lv00 /home/user9
Where /dev/lv00is the file system name and /home/user9is the mount point.

You can also unmountthe file system if not required at present. The syntax for the unmountcommand is:
# unmount /home/user9 ( only the mount point name is enough)
The administrator or members of the security group may issue the mount commands assuming that the user has write permission to the mount point and read permission on the root directory of the file system to be mounted.

Change characteristics of a File System


Explanation:

The chfs command can be used to change the attributes of a file system. The picture above is showing how you can use SMIT to change and see the characteristics of a file system.

Dynamically Shrinking a JFS2 File System


Remove a file system


Explanation:


You can use the command rmfsto remove a file system.
The picture shows how you can use the smit to remove a file system.
The file system must be unmountedfrom the tree structure in order to remove the file system. If some user or some processes are using the file system, you will not be able to remove the file system.

NOTE: rmfscommand will remove any information of the file system from the ODM and the /etc/filesystems. When a file system is removed, the logical volume on which it resides is also removed.


Add a RAM File System


•Create a RAM disk of 4 MB
# mkramdisk 4M
/dev/rramdisk0

•Create a JFS file system on this RAM disk
# mkfs -V jfs /dev/ramdisk0
mkfs: destroy /dev/ramdisk0 (yes)? y

•Create mount point
# mkdir /ramdisk

•Mount RAM file system
# mount -V jfs -o nointegrity /dev/ramdisk0 /ramdisk


Thursday 9 June 2011

Working with AIX filesystem PART 1


Objectives for the module
Understand various components of AIX file system.

File system structure

Explanation:

File system resides on a logical volume. So the size of the file system would be in multiples of logical partitions. Every logical partition would be pointing to a physical partition.
An individual file within a file system would be allocated data blocks which is usually 4 KB in size. In traditional UNIX systems the data block size was 512 bytes.

The first very important component of a file system is called the superblock. The superblock contains information about the file system in terms of the name of the file system, its size, number of inodes in the file system, etc.

The superblock information is very critical and will be utilized by the system whenever the file system has to be mounted and accessed. If the superblock goes corrupt, then the file system will not be able to be mounted also. So a backup copy of the superblock is always written in block 31.

Right after the superblock are the inodes. Inodescontains information of files like file permissions, file type, size, owner, group, created/modified date and time and they also contain the pointers to data block.
Data block contain data. Indirect data block maintain addresses to the actual data block.

Contents of the inode


Explanation:
This is the structure of the inodes. Each file on your system is represented by a single inode. The inode for a file contains information about the file in terms of
>Inode number for the file
>Ownership
>Access Permissions
>Type of the file
>Creation, modification and access times
>Number of links to the file
>Size
>Addresses of data blocks on disk.

Use can use the command ls with the option –i to look at the contents of the inode for that file.

File System Fragmentation


Explanation:
In AIX the filesystemis broken into blocks called as data blocks. These data blocks by default are 4 kb in size i.e. 4096 bytes in size.

Lets imagine you have a file called file1 which is about 1900 bytes. To store this file in the filesystem, you will require a data block (4 kb). That means file1 occupies 1900 bytes of the data block and the rest of the space in the 4 kb data block is empty. But even though rest of the space is empty, this space cannot be utilized by the file system to allocate it any other file. So in these circumstances, potentially you could have more amount of unused or wasted space.

Here is where we can get an intro to the concept of “Fragmentation”.

Fragmentation is a concept wherein a single data block can be broken logically into smaller fragments of size ranging from 512 bytes to 4 kb. Lets say I choose a fragment size of 1kb, that means the data block of 4 kb size is broken into 4 fragments.This would ensure that if there was a small file lets say about 1900 bytes, to store this particular file, I would potentially use up only 2 fragments of the data block and the other two fragments can be allocated to files if necessary. Thus reducing the amount of unused and wasted space in your filesystems.

Number of bytes per inode


For how many number of bytes should a inode be generated ?
for example: nbpi=4096 would create an inode for every 4096 bytes.

Explanation:
In a Journaled File System, when ever a file is created, its respective inode also has to be created. The inode maintains details about the file. In earlier versions of JFs, the number of inodes created for a file system was fixed and it was generated for every 4 KB of disk space of that file system. That means 1024 inodes would be generated. If the data block size also remains at 4 KB, these many inodes was actually enough to cater to the needs of the file system.

But since fragmentation came into picture, wherein instead of sticking to 4 KB data block size, the data block was able to be fragmented in smaller sizes lets say 1024 ie1KB, the need for more number of inodes also increased since there would be potentially more smaller files in the file system. Here is where the nbpi value (number of bytes per inode) can be reduced/changed to suit the requirements. So now nbpi=1024 would mean, please create a inode for every 1024 bytes of the space allocated to this file system.

Allocation Group Size


Explanation:

Allocation group size concept increases the efficiency of the file system. Allocation group is nothing but a logical grouping of related datablocks and the inode into a single group to increase the speed at which the data can be accessed within a filesystem.

The following small table gives you the Allocation Group Size and its respective nbpi values that are supported:
Allocation Group Size                   NBPI
8 MB                              512,1024,2048,4096,8192,16384
16 MB                           1024,2048,4096,8192,16384,32768
32 MB                           2048,4096,8192,16384,32768,65536
64 MB                           4096,8192,16384,32768,65536,131072


Compressed file system


Explanation:
Compressed file system save disk space by allowing a logical block to be stored on the disk in units or fragments smaller than the full block size of 4096 bytes.

Data compression allows all logical blocks of any sized file to be stored as one or more contiguous fragments. On an average, data compression saves disk space by about a factor of 2. There is no support for compression with JFS2 file system.

Recommendations: The root file system must not be compressed. Compression of the /usr file system is not recommended.

Large File Enabled File Systems

                                            File = 132 MB


(1024 * 4 KB blocks) + (1024 * 128 KB blocks) = 132 MB
4 MB                          + 128 MB                          = 132 MB


Explanation:

Before discussing the Large File Enabled File System, Lets take a normal scenario of a file of size 140 MB. The default block size for this file system is 4 KB. That means, to store a file of 140 MB size in 4 KB blocks we would require 140 MB /4 KB = 35840 number of data blocks. That means to read this file the system has to perform 35840 I/O operations.

With Large File Enabled File System, the first 4 MB of the file will be allocated in 4 KB blocks and the rest of it will be allocated in 128 KB blocks. That means for the same file which is 140 MB in size, first 4 MB will be allocated using 4 KB blocks (4MB / 4 KB = 1024 blocks) and rest of the file is 136 MB will be allocated in 128 KB block ( 136 MB / 128 KB=1088 blocks). Totally in a Large File Enabled File System to allocate this file of 140 MB only 1024+1088 ie 2112 data blocks will be required and this calculation itself is an indication how a Large File Enabled File System can bring in performance. ( Only 2112 I/O operations are required to read the file instead of 35840 blocks.

Journal Log


Explanation:

Jfslogs are kept in /dev/hd8. The journal logs are circular logs. The size of the journal log is 1 PP size. The jfslog is used to ensure file system integrity by writing all metadata information to the jfslog immediately.
In journal log, only inode and indirect data block information is stored and not the actual data block.
There is also a new feature called inline log that is introduced with JFS2. This inline log allows you to log directly to the file system.

Difference between JFS and JFS2


Explanation:

JFS2 (Enhanced JournaledFile System)
Is a new file system introduced in AIX5.1. The base for JFS2 is JFS file system. At present JFS2 is the only standard file system supported on Itanium based platform.

Extent Based Allocation:
JFS2 uses extent based allocation. An extent is an address length pair, which identifies the starting block address and the length of the extent in blocks. This allows multiple adjacent blocks to be addressed. The advantage of extend based allocation are high performance and large file size.

In JFS2 the inodes are created dynamically i.e. on fly whereas in JFS there was a fixed number of inodes that was getting created during the creation of the file system. An inode in JFS2 file system is of size 512 bytes when compared to the JFS inode size of 128 bytes.

Migration issues: JFS and JFS2 can co-exist on the same system. But to migrate a JFS into JFS2, take the backup of data on the JFS file system, create a new JFS2 file system, restore the JFS file system backup on the new JFS2 file system.


Incoming search terms:
AIX file system structure
File system in AIX
AIX filesystem
Description of AIX filesystem
JFS and JFS2
Difference between JFS and JFS2
Journal log
Journal log in AIX
Inode in AIX
Allocation group size in AIX
Compressed file system in AIX
step by step create a filesystem on aix


Monday 6 June 2011

AIX Data Storage - Part 5

WORKING WITH LOGICAL VOLUME MANAGER (LVM) - SUB-PART 3:


Objectives for the module
>Working with Physical Volumes


Physical Volumes

Explanation:

Physical Volumes are nothing but the hard disks. These physical volumes belong to a volume group.

Physical Partitions (PP) is the smallest allocatableunit on your physical volume. These physical partitions should be the same size across the entire Volume Group. However, since there can be multiple Volume Groups on a single system, each volume group can have different PP size. The PP size can be in the range 1-1024 MB.

Default number of PPs per Physical Volume is 1016 but can be increased to suit your requirements.

Physical Volumes Menu


You can use the fastpath # smit pv to get into this screen. Each of these options will be discussed shortly one by one as follows:

List physical Volume Information

Explanation:

The command lspv which stands for list all physical volumes in the system, internally uses the undocumented command getlvodm –C to list the physical volumes in the system.

The lspv command without any parameter can be used to list the physical volume name, the PV identifier, and the Volume Group name that it belongs to.

The command lspv <pvname> gives the status information, number of PPs, PP size, to which volume group it belongs to, free PPs and its distribution in terms of intra policy etc.

Listing physical Volume Information..(continued..)


Explanation:
The command lspv –l hdisk0 lists all the logical volumes present on a physical volume. The output of the command would give information about the LV name, number of LPs, number of PPs, Its distribution and its mount point.

Listing physical Partition map for a Physical Volume


Explanation:

The command lspv –p pvname lists all the logical volumes on a disk and they physical partitions to which its logical partitions are mapped.

The output of the command would display, the PP number, its STATE  ie whether its free or used up, intra region where the PP is situated, LV name, type of the LV and mount point.

Add/Move contents of a physical volume


•Add a disk -> Can be done using SMIT or by cfgmgr when the system boots up.
•To move the contents of a physical volume
# migratepv –l lv00 hdisk0 hdisk1


Explanation in detail:

To add a physical volume to the system, you can use the Add a Disk option from the fixed disks menu under Devices  main menu in SMIT.

Once the disk is added to the system, it has to be made part of a volume group so that you can start using the disk.

Another method of adding a disk to the system is, power off the system, add the new disk physically to the system. Power On the system during which the program called cfgmgr will be invoked to configure the newly added disk.
Once the new disk is added, if you want to migrate a existing logical volume from old disk to the new one, you can use the command called migratepv.

The syntax for migratepv command is
# migratepv –l lv00 hdisk0 hdisk1
I.e. –l option to specify the logical volume name that you are planning to migrate followed by the source hard disk name and the destination hard disk name.

Documenting the Disk Storage


•List of the disks on the system (PVID and volume group):
# lspv
•List the volume groups:
# lsvg
•List what logical volumes are contained in each volume group:
# lsvg -l vgname
•List the logical volumes on each disk:
# lspv -l pvname


Incoming Search Terms:
LVM
LVM in detail
Details of LVM
Details of LVM in AIX
AIX LVM
Physical volumes in AIX
AIX physical volumes
physical volume explained
Everything about physical volume
Everything about AIX physical volume

Thursday 2 June 2011

AIX Data Storage - Part 4

WORKING WITH LOGICAL VOLUME MANAGER (LVM) - SUB-PART 2:


Objectives for the module
>Working with Logical Volumes
>Mirroring & Stripping

Logical Storage


Explanation:
Logical Volumes is a collection of logical partitions which may span across multiple physical volumes in the same volume group.

A file system structure is usually sits on top of a logical volume.
If required, the logical volume can be dynamically increased.

There is a limit of 512 LVs per Volume Group.
Logical Partitions are mapped to the physical partition. Usually this mapping is one-to-one unless there is mirroring done on the LV.


Mirroring


Explanation:
Mirroring is when a logical partition maps to more than one physical partition of the same volume group.

Ideally each copy must reside on a separate disk but this restriction can be removed.

There are various mirroring scheduling policies:
a.Parallel policy: Read: On each read, the system checks whether the primary is busy. If its not busy, the read is initiated on the primary, otherwise from secondary.
                            Write: Initiated concurrently.
b. Parallel/Sequential: Read: Always reads on primary copy.
                                     Write: Initiated concurrently.
c. Parallel/Round robin: Read: Alternates between copies, resulting in equal utilization.
                                        Write: Initiated concurrently.
d. Sequential: Read: Always reads on primary copy.
                       Write: initiated serially, first to the primary and then to secondary disk

MWC ( Mirror Write Consistency)

Explanation:

MWC (Mirror Write Consistency) ensures data consistency on logical volumes in case of system crashes during the mirrored writes.

There are two methods of MWC :
a.Active Method: Consistency is achieved by logging when a write occurs. LVM makes an update to the MWC log that identifies what areas of the disk are being updated before performing the write of the data. This actually results in a performance degradation during random writes.

b.Passive Method: Introduced with AIX version 5.1. Passive method reduces the problem of having to update the MWC log on the disk. This method logs that the logical volume has been opened but does not log writes. If the system crashes, then the LVM starts a forced synchronization of the entire logical volume when the system restarts.

You can set MWCfor a logical volume by using the option –wwith either the mklvcommand or with the chlv command. The various options to set for the MWC option(-w) are:

a.y or a (Yes or Active) –Each write is logged to MWC log. Default value setting.
b.P ( Passive)–Use the passive method.
c.n (No)–There is no MWC, if there is a crash, then the mirrored LVs are in inconsistent state.

Striping

•Normal flow of data blocks when a logical volume is spread across physical volumes:

•The layout of stripe units when a logical volume is set up to stripe:

•Consecutive stripe units are created on different physical volumes
•Striping increases read/write sequential throughput by evenly distributing stripe units among disks
•Stripe unit size is specified at creation time

Striped Columns

Explanation:

Striping is a technique for spreading the data in a logical volume across several hard disks such that I/O capacity of all disk drives can be simultaneously used.

In a non striped logical volume, data is accessed using the addresses to the data blocks within the physical partitions.

In a striped logical volume, the data is accessed using the addresses of the stripe units (data of a striped logical volume is broken into units called stripe units). The size of the stripe unit is usually specified during the creation time and it could range form 4 kb to 128 kb.

To implement striping at your size, at least two physical volumes are required. Recommendation is that the number of physical partitions allocated to a striped logical volume must be able to be evenly distributed among the disks.

Intra-physical volume allocation policy:

Inter-physical volume allocation policy:

  • Maximum number of physical volumes to use
  • Range of physical volumes to use
Explanation:
Intra physical volume allocation policy specifies where on the physical volume the partitions will be allocated to the logical volume. The choices could be inner edge, inner middle, centre, outer middle and outer edge areas. Usually the centre area generally was the area with the best performance on older disks but may not be true with the newer disks. You may have to go through the documentation for the hard disks to come to a conclusion.

Inter physical volume allocation policy specifies how many physical volumes can be used to contain the physical partitions of the logical volume. It also specifies the range of volumes used i.e. minimum ( allocate partitions on one physical volume or as many as there are (maximum).

Logical Volume Menu


Explanation:
You can use the fastpath #smit lv to get into the main menu pertaining to the logical volumes.
You can use this menu to continue with the management tasks which may relate to listing all the logical volumes by volume group, Add a logical volume, set the characteristics of a logical volume, show the characteristics of a logical volume, remove a logical volume, copy a logical volume if required.

Viewing characteristics of Logical Volume

Explanation:
The command # lslv –l <lvname> gives information about the distribution of a particular logical volume’s logical partitions for each physical volume.

The output shows:
a.The name of the physical volume.
b. Number of logical partitions on the disk and its copies if any.
c.In Band –percentage of physical partitions which match the intra policy of the logical volume
d.Distribution of physical partitions on the physical volume ( outer edge, outer middle, centre, inner middle and inner edge)

Copies information for e.g. : 001:000:000, the first information is regarding the first copy i.e. 1 pp. The next two fields hold information regarding the second and third mirrored copies on the physical volume.

The command #lslv –m <lvname> would give information about the LPs and its mapping to the physical partitions and the physical volumes on which these physical partitions are present.
First set of values are for the first copy and the second and the third columns are for mirrored copies if any.

Adding a Logical Volume

Explanation:
You can use the fastpath $ smit mklv to get into this SMIT menu to add a new logical volume. The mandatory options here would be the name of the Volume Group where you want to create the Logical 

Volume and the size of the logical volume in terms of the number of Logical Partitions to allocate to the logical volume. If required you can also specify the name of the logical volume that you are creating. If not by default it creates a logical volume with the name starting aslvand then followed by a running sequential number like lv00, lv01 etc.

Removing a Logical Volume


Explanation:
If a logical volume is not required, you can use the fastpath # smit rmlv to remove a logical volume.
You can also use the high level command rmlvto remove a logical volume.

Recommendation: Do not use the rmlv command to remove journaledfile systems or paging space, This high level structures have information relating to them saved in the ODM database and in some files like /etc/filesystems. The command rmlvcommand doesn’t cleanup the lvrelated information from the database or the file.

Set Characteristics of a Logical Volume


Explanation:
You can use the fastpath #smit lvsc to set the characteristics of a logical volume.
You can change the logical volume details, you can rename a logical volume, you can increase the size of a logical volume, Add a copy to a logical volume, and remove a copy from a logical volume.

In AIX 5.1 and above the size of the logical volume may not be decreased dynamically. To make a logical volume smaller, you may have to backup the data, delete the logical volume, recreate a logical volume with the desired small size and restore the data.
You can use the high level command # chlv to change the various attributes of the logical volume.

Viewing characteristics of logical volumes


Explanation:
The command discussed here is the lsvgcommand to list the characteristics of a volume group. The various options used are:-
-il-> to list the logical volumes within the volume group. Option –i of lsvg reads the list of volume groups from the standard input.
-o-> active volume groups.

Show Logical Volume Characteristics


Explanation:
The command lslv is to list the characteristics of a logical volume.

The output of the command gives the details about the logical volume. It shows the state of the volume group,typeof the logical volume, inter and intra policy of the logical volume, mount point, state of the LV, number of LPs within the LV etc.

Write Verify :specifies whether to verify all writes to the logical volume with a follow-up read.

Bad Block:specifies whether the Logical Volume Manager should try to relocate a bad block if one is encountered.

Add/Remove a logical Volume Copy


Explanation:
You can use the fastpath # smit mklvcopy to get into this option to add/remove the number of logical partition copies.
You can also use the high level command called mklvcopy to add copies (mirroring) to a logical volume that has none or to increase the copies from two or three.
You can use rmlvcopy command to reduce the total number of copies for a logical volume.

NOTE: Once a logical volume has been created, striping cannot be imposed on it or removed from it.
The mirrored copies in order to be matching to each other, the logical volume has to be synchronized using the syncvg command.

Reorganizing a Volume Group


Explanation:

When you change the intra-physical volume policy ( centre, middle, edge) the physical partition will not relocate automatically.

You can use the fastpath #smit reorgvg or the high level command reorgvg to relocate or re-distribute the physical partitions according to the intra policy.

E.g.: # reorgvg datavg mylv lv01

If you issue reorgvg command with the volume group name but no logical volume name, the entire volume group gets reorganized


Incoming Search Terms:
Everything about Logical Volume
AIX logical volume
Logical volume in detail
Working with Logical volume
Stripping and mirroring
how to perform stripping and mirroring in AIX
Guide to logical volume in AIX
Guide to logical storage data in AIX
LVM in AIX