Objective of the module:
How to create a file system
Change the characteristics of a file system
File Systems

Explanation:
You can use the fastpath#smitfsto get into this menu option in AIX to perform file systems related tasks.
File systems can also be managed using the Web Based System Manager.
Listing file systems
 Explanation:
You can use the commandlsfsto get a list of all the file systems.
The output in the above visual shows details about the file system. The various attributes of the output are:
a.Name of the file system
b.Node Name, which is only valid if the file system is a Network file system.
c.Mount Point for the file system.
d.Virtual File System (jfs, jfs2 or cdrfs)
e.Size of the file system
f.Mount options if any, like ro(read only) or rw(read-write)
g.Auto, automatic mounting during system startup or not.
You can also use the fastpath #smitfs to get the same details.
Mounted File Systems listing

Explanation:
The mount command can be used to list all the file system that are at present mounted on your system.
It gives you details about the node (valid only for a NFS file system), the logical device name of the file system, mount point, vfs information, date when it was mounted and mount options if any (readonly, readwrite, log information).
You can also get the same information from SMIT also.
Adding a File System
Explanation:
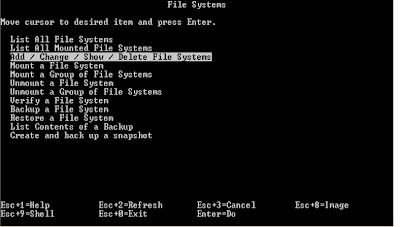
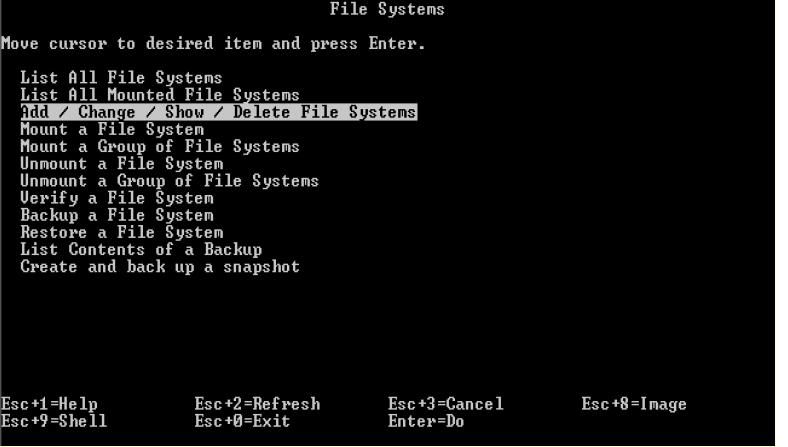
These are the general steps in SMIT to start with the job of creating a file system.
#smit fs will take you to this menu option. Here you can choose the option,
Add/Change/Show/Delete File systems to start adding a file system.
In the next step it asks you to select the type of file system is JFS, JFS2 or cdrfs or NFS. Lets say you select the Journalled File System.

Adding a file system on a previously created LV

Explanation:
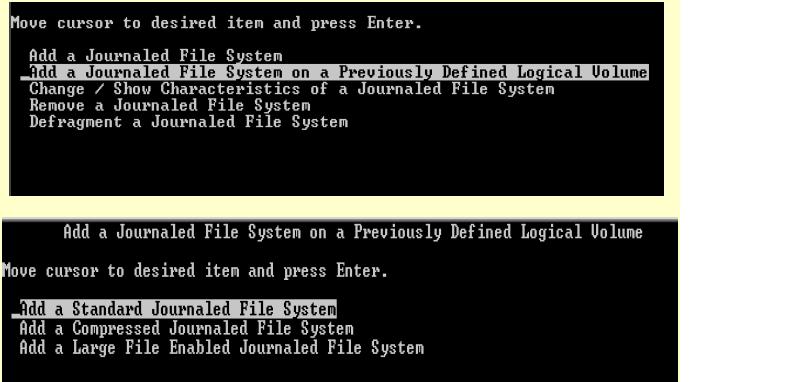
In this step, it asks you to select whether you want to create a file system directly or you want to create the file system on a previously defined logical volume.
Lets say you have already created a logical volume and now you want to just create a file system over it, then the ideal option to select is the second option ie Add a journaledfile system on a previously defined logical volume.
When you select the option, it asks you select the type of Journaledfile System iestandard, Compressed or Large File Enabled File System. Lets say you select to add a standard Journalled File System you’ll be shown the appropriate screen to make selections.
Adding a standard jfs file system on previously defined logical volume

Explanation:
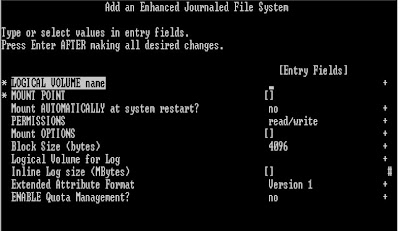
This is the dialog panel to create a file system on an existing logical volume.,
The only mandatory fields here are the logical volume name on which you are planning to create the file system and the mount point.
Adding standard JFS

Explanation:
The picture above shows you how you can create a file system directly. That means you want to create the file system and the logical volume in a single step.
The mandatory fields here are you need to select the volume group name where you are planning to create the file system, specify the size of the file system, and the mount point for your file system.
The name of the logical volume thus created will follow the default naming convention in AIX for naming logical volumes i.e. lv00, lv01,lv02 …..
Add a JFS2 File System on a previously created Logical Volume
Explanation:
The above snap shows how you can create a JFS2 file system on a previously existing logical volume. The options are the same like the JFS file system except for the options of having an inline logwhich is a log placed in the same file system.
Add a JFS2 file system

Explanation:
This picture shows how you can directly create a JFS2 file system that means create a logical volume and the JFS2 file system over it in one single step.
Most of the options are just like JFS ie you need to specify the volume group name where the logical volume will be created, the size of the file system and the mount point. You also have an option of enabling inline log option if required.
Mount a File System

Explanation:
You can use the command mount to mount a file system. This can also be done using smit.
File systems that are defined in the file /etc/filesystems with mount=trueor mount=automatic options will be mounted automatically during system startup.
You can either mount a single file system or a group of file systems.
The syntax for mount is
# mount /dev/lv00 /home/user9
Where /dev/lv00is the file system name and /home/user9is the mount point.
You can also unmountthe file system if not required at present. The syntax for the unmountcommand is:
# unmount /home/user9 ( only the mount point name is enough)
The administrator or members of the security group may issue the mount commands assuming that the user has write permission to the mount point and read permission on the root directory of the file system to be mounted.
Change characteristics of a File System

Explanation:
The chfs command can be used to change the attributes of a file system. The picture above is showing how you can use SMIT to change and see the characteristics of a file system.
Dynamically Shrinking a JFS2 File System

Remove a file system

Explanation:
You can use the command rmfsto remove a file system.
The picture shows how you can use the smit to remove a file system.
The file system must be unmountedfrom the tree structure in order to remove the file system. If some user or some processes are using the file system, you will not be able to remove the file system.
NOTE: rmfscommand will remove any information of the file system from the ODM and the /etc/filesystems. When a file system is removed, the logical volume on which it resides is also removed.
Add a RAM File System
•Create a RAM disk of 4 MB
# mkramdisk 4M
/dev/rramdisk0
•Create a JFS file system on this RAM disk
# mkfs -V jfs /dev/ramdisk0
mkfs: destroy /dev/ramdisk0 (yes)? y
•Create mount point
# mkdir /ramdisk
•Mount RAM file system
# mount -V jfs -o nointegrity /dev/ramdisk0 /ramdisk
How to create a file system
Change the characteristics of a file system
File Systems

Explanation:
You can use the fastpath#smitfsto get into this menu option in AIX to perform file systems related tasks.
File systems can also be managed using the Web Based System Manager.
Listing file systems

You can use the commandlsfsto get a list of all the file systems.
The output in the above visual shows details about the file system. The various attributes of the output are:
a.Name of the file system
b.Node Name, which is only valid if the file system is a Network file system.
c.Mount Point for the file system.
d.Virtual File System (jfs, jfs2 or cdrfs)
e.Size of the file system
f.Mount options if any, like ro(read only) or rw(read-write)
g.Auto, automatic mounting during system startup or not.
You can also use the fastpath #smitfs to get the same details.
Mounted File Systems listing

Explanation:
The mount command can be used to list all the file system that are at present mounted on your system.
It gives you details about the node (valid only for a NFS file system), the logical device name of the file system, mount point, vfs information, date when it was mounted and mount options if any (readonly, readwrite, log information).
You can also get the same information from SMIT also.
Adding a File System
Explanation:
These are the general steps in SMIT to start with the job of creating a file system.
#smit fs will take you to this menu option. Here you can choose the option,
Add/Change/Show/Delete File systems to start adding a file system.
In the next step it asks you to select the type of file system is JFS, JFS2 or cdrfs or NFS. Lets say you select the Journalled File System.

Adding a file system on a previously created LV
Explanation:
In this step, it asks you to select whether you want to create a file system directly or you want to create the file system on a previously defined logical volume.
Lets say you have already created a logical volume and now you want to just create a file system over it, then the ideal option to select is the second option ie Add a journaledfile system on a previously defined logical volume.
When you select the option, it asks you select the type of Journaledfile System iestandard, Compressed or Large File Enabled File System. Lets say you select to add a standard Journalled File System you’ll be shown the appropriate screen to make selections.
Adding a standard jfs file system on previously defined logical volume

Explanation:
This is the dialog panel to create a file system on an existing logical volume.,
The only mandatory fields here are the logical volume name on which you are planning to create the file system and the mount point.
Adding standard JFS

Explanation:
The picture above shows you how you can create a file system directly. That means you want to create the file system and the logical volume in a single step.
The mandatory fields here are you need to select the volume group name where you are planning to create the file system, specify the size of the file system, and the mount point for your file system.
The name of the logical volume thus created will follow the default naming convention in AIX for naming logical volumes i.e. lv00, lv01,lv02 …..
Add a JFS2 File System on a previously created Logical Volume

Explanation:
The above snap shows how you can create a JFS2 file system on a previously existing logical volume. The options are the same like the JFS file system except for the options of having an inline logwhich is a log placed in the same file system.
Add a JFS2 file system

Explanation:
This picture shows how you can directly create a JFS2 file system that means create a logical volume and the JFS2 file system over it in one single step.
Most of the options are just like JFS ie you need to specify the volume group name where the logical volume will be created, the size of the file system and the mount point. You also have an option of enabling inline log option if required.
Mount a File System

Explanation:
You can use the command mount to mount a file system. This can also be done using smit.
File systems that are defined in the file /etc/filesystems with mount=trueor mount=automatic options will be mounted automatically during system startup.
You can either mount a single file system or a group of file systems.
The syntax for mount is
# mount /dev/lv00 /home/user9
Where /dev/lv00is the file system name and /home/user9is the mount point.
You can also unmountthe file system if not required at present. The syntax for the unmountcommand is:
# unmount /home/user9 ( only the mount point name is enough)
The administrator or members of the security group may issue the mount commands assuming that the user has write permission to the mount point and read permission on the root directory of the file system to be mounted.
Change characteristics of a File System

Explanation:
The chfs command can be used to change the attributes of a file system. The picture above is showing how you can use SMIT to change and see the characteristics of a file system.
Dynamically Shrinking a JFS2 File System

Remove a file system

Explanation:
You can use the command rmfsto remove a file system.
The picture shows how you can use the smit to remove a file system.
The file system must be unmountedfrom the tree structure in order to remove the file system. If some user or some processes are using the file system, you will not be able to remove the file system.
NOTE: rmfscommand will remove any information of the file system from the ODM and the /etc/filesystems. When a file system is removed, the logical volume on which it resides is also removed.
Add a RAM File System
•Create a RAM disk of 4 MB
# mkramdisk 4M
/dev/rramdisk0
•Create a JFS file system on this RAM disk
# mkfs -V jfs /dev/ramdisk0
mkfs: destroy /dev/ramdisk0 (yes)? y
•Create mount point
# mkdir /ramdisk
•Mount RAM file system
# mount -V jfs -o nointegrity /dev/ramdisk0 /ramdisk


This comment has been removed by a blog administrator.
ReplyDelete